
A Low-Risk Way to Remove Gum Without Ruining the Seat
Chill it in a sealed bag until firm, lift with a nearly flat plastic card, then patch-test a material-compatible cleaner for residue.
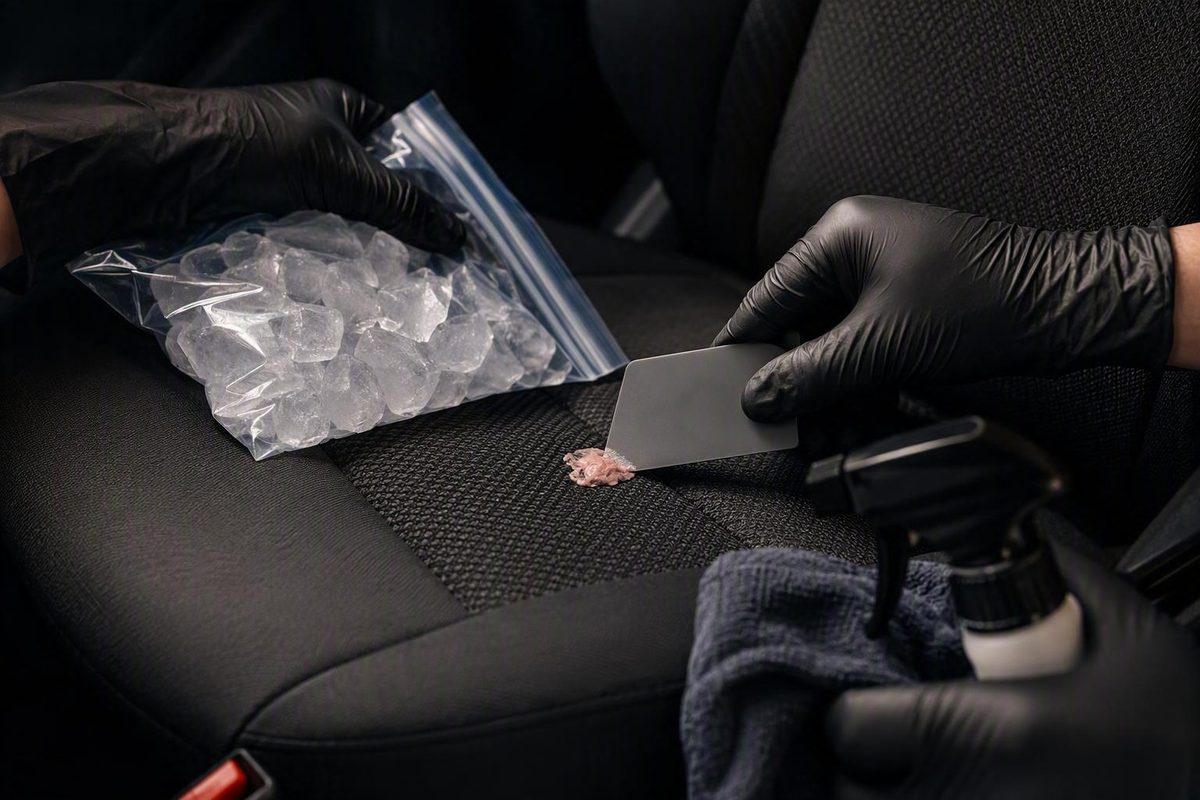
Quick answer: chill, lift, clean, and inspect
If you have just found gum on a car seat, do not pull or scrub it while it is soft. Put ice cubes or a cold pack inside a sealed, waterproof plastic bag. If desired, place a clean, dry cloth around the bag to protect the surface, but do not rely on cloth alone as a moisture barrier. Hold the cold pack against the gum without rubbing. Once the gum feels hard rather than pliable, lift it from the outer edges with an expired card or plastic scraper held nearly flat. If it begins to bend, stretch, or smear, stop and chill it again.
Related: How to Dilute OMNIA 2.0 Interior Cleaner.
Published timing varies. Panda Hub recommends chilling for about 5–10 minutes, while emphasizing that the gum should harden before it is lifted. See Panda Hub’s sealed-ice and flat-card method.
LeatherNeo suggests about 15–20 minutes for leather. Treat both ranges as estimates rather than guarantees: the practical endpoint is gum that remains firm as you begin lifting. See LeatherNeo’s leather-focused cold method.
Gather these supplies before starting:
- Ice or a cold pack inside a leak-free plastic bag
- An expired plastic card or purpose-made plastic scraper
- Several clean, colorfast microfiber towels
- A cleaner whose label explicitly names the seat material
- Optional fine tools, such as tweezers or cotton swabs, for loose fragments
- The vehicle manual or upholstery-care instructions
Identify the upholstery as accurately as possible. Check the vehicle manual, a seat or seat-cover care label, and the cleaner label before putting liquid on the surface. “Leather-look” is not a material specification: genuine leather, coated leather, synthetic leather, and vinyl can look similar while requiring different care. If you cannot establish what the seat is made from, limit your attempt to chilling and very gentle lifting until you find material-specific instructions.
This guide concerns ordinary vehicle upholstery. It does not cover child-restraint covers, harness straps, or webbing. For those items, use the cleaning instructions supplied by the child-restraint manufacturer rather than adapting a general upholstery process.
Step by step: freeze and lift the bulk of the gum
The first objective is not to dissolve the gum. It is to remove as much of the main deposit as possible without spreading it or introducing unnecessary liquid.
-
Stabilize the area. Park out of direct sun if practical, open a door for working room, and keep anyone from sitting on the gum. Avoid repeatedly touching it with your fingers because handling can soften the deposit.
-
Seal the ice or cold pack. Put several ice cubes in a sturdy, leak-free plastic bag, press out excess air, and close it securely. Put a reusable cold pack inside a waterproof bag as well. A dry cloth may be placed outside the bag for surface protection, but it does not replace the sealed moisture barrier.
-
Apply cold without grinding. Hold the bag against the gum rather than rubbing it back and forth. Grinding can spread softened edges into fabric texture, stitching, or perforations. Wait until the gum feels firm and resists bending.
-
Approach from an outer edge. Slide the edge of an old plastic card beneath a raised margin. Keep the card almost parallel to the seat instead of pointing it downward. Work from the outside toward the center.
-
Lift a small section at a time. Use short, controlled movements. Gather the gum inward rather than dragging it into a wider ring. On cloth, stop if the tool begins pulling loops or distorting the weave.
-
Refreeze at the first sign of stretching. Gum that bends, strings, or smears is too warm. Do not compensate by increasing force or using a steeper tool angle. Apply the cold pack again and wait for the deposit to firm.
-
Collect fragments immediately. Put detached pieces on a disposable towel or in a small trash bag. Do not leave them on another part of the seat, where hand or cabin warmth may soften them enough to stick again.
-
Repeat patiently. Old, flattened, or compressed gum may require several freeze-and-lift cycles. Repetition is preferable to digging into the upholstery.
Soft gum should not be scrubbed. On cloth, rubbing can widen the affected area or push gum farther among the fibers. Around seams, texture, or perforations, aggressive rubbing can make the deposit harder to reach. Commercial detailing guidance consistently recommends gentle lifting and rechilling rather than forceful scrubbing. Florida Sudz also advises using a nearly flat plastic edge and avoiding sharp tools.
Do not use a knife, screwdriver, razor blade, metal pick, or similar sharp tool. Metal edges can scratch a finish, puncture upholstery, cut stitching, or fray fabric. A plastic card can still cause damage if used forcefully, but its broad, smooth edge is less aggressive when held nearly flat. Right Car Detailing likewise advises against sharp metal tools, forceful pulling, aggressive rubbing, and untested solvents. Review its upholstery-removal precautions.
Bulk removal is complete when no more gum can be lifted without scraping the seat itself. A thin sticky film may remain. Treat that film as a separate cleaning problem rather than grinding it away with the card.
Choose a residue treatment based on the seat material
Remove the hardened bulk before introducing a cleaner.
No supplied evidence establishes one residue cleaner as universally safe for automotive fabric, leather coatings, synthetic upholstery, and vinyl. Compatibility with the identified material—not whether a remedy is common in the kitchen—should determine what you use.
| Seat material | Lower-risk first choice for residue | Important cautions |
|---|---|---|
| Cloth or woven fabric | Automotive upholstery cleaner approved for that fabric, or a manufacturer-approved mild treatment | Apply to a towel rather than pouring it onto the seat. Blot with minimal moisture. |
| Vinyl | Cleaner whose label explicitly permits use on automotive vinyl | Do not assume that a cleaner for generic “leather-look” material is suitable. Stop for dulling, tackiness, or color transfer. |
| Synthetic leather | Product labeled for the named synthetic surface | Formulations and topcoats vary. Do not automatically treat the surface as vinyl or genuine leather. |
| Coated leather | Automotive leather cleaner compatible with the vehicle’s finish | Alcohol, vinegar, and general-purpose solvents may alter coating, gloss, dye, or feel. |
| Uncoated or specialty leather | Manufacturer-specified leather cleaner or professional treatment | Water and solvents may affect color or texture. Correct identification is especially important. |
| Suede or Alcantara | Manufacturer instructions or a qualified upholstery professional | Do not improvise with generic solvents, oily remedies, heat, or steam. |
For cloth seats
Choose a material-compatible automotive upholstery cleaner first. Apply a small amount to a clean white or colorfast microfiber towel—not directly to the seat—and blot the remaining film from the outside toward the center. Move to a clean part of the towel as residue transfers.
If the vehicle or upholstery manufacturer explicitly approves a mild soap treatment, follow its dilution, application, and removal instructions. Do not assume that more cleaner will work better. Excess liquid can spread residue and reach the padding, while vigorous rubbing can distort fibers or enlarge the spot. Guidance for fabric and seat covers favors blotting, limited moisture, hidden-area testing, and thorough drying. Seat Cover Solutions describes these material-dependent precautions.
For vinyl and synthetic leather
Use a product whose label identifies the exact surface.
Apply the approved product sparingly to a towel. Blot or wipe gently while keeping liquid away from seams and openings as much as practical. Stop if the test area becomes matte, unusually shiny, sticky, softened, rough, or discolored.
For coated or genuine leather
Begin with an automotive leather cleaner approved for the vehicle’s finish. Do not treat rubbing alcohol or vinegar as routine first choices.
Commercial recommendations conflict. Some articles propose alcohol or vinegar for remaining gum, while others warn that these liquids may dry leather or affect its dye, protective coating, or gloss. LeatherNeo, for example, presents alcohol as a residue treatment but also requires a concealed-area test for discoloration or damage. That qualification is not proof that alcohol is compatible with every automotive leather finish.
If you cannot identify the leather or its coating, do not guess. A visible finish change may be harder to correct than the original trace of gum.
For suede and Alcantara
Do not use a generic DIY chemical recipe.
Attempt chilling and gentle lifting only if you can do so without pulling the material. For residue or embedded gum, follow the vehicle manufacturer’s care instructions or consult a qualified upholstery professional.
How to patch-test correctly
A patch test should reproduce the planned treatment on a concealed part of the same material:
- Select an inconspicuous lower or rear section made from the same upholstery—not a nearby trim panel that merely looks similar.
- Put the smallest practical amount of product on a clean towel.
- Dab the test spot using the contact time and technique you plan to use on the residue.
- Remove or blot the product exactly as its label directs.
- Let the test area dry fully.
- Inspect it in good light and compare it with the surrounding material.
Check for dye on the towel, discoloration, dullness, extra shine, tackiness, stiffness, cracking, swelling, roughness, or a changed texture. If any change appears, do not use the product on the visible spot.
A successful patch test reduces uncertainty; it does not prove that heavier application, longer contact, or an already-damaged area will react identically. Continue using the minimum amount of liquid and blot rather than scrub.
Handle seams, stitching, texture, and perforations cautiously
Gum in stitching, a seam, or a perforation is not simply a smaller version of gum on a flat panel. The deposit is harder to approach without snagging thread, distorting material, or pushing gum beneath the visible surface.
Refreeze every visible deposit before trying to lift it. If loose fabric needs support, hold it gently without stretching the seam.
Fine, nonsharp tools may help with fragments that are already loose:
- Tweezers: Use only to grasp gum that is visibly clear of fibers or thread.
- Cotton swabs: Use to collect tiny chilled particles or apply a compatible cleaner precisely.
- Soft brush: Consider only on durable cloth and stop if it abrades or distorts the weave.
- Blunt wooden toothpick: Use the side or rounded end gently; never jab it into a seam or hole.
- Lint roller: It may collect frozen flakes from cloth, provided its adhesive does not fuzz, pull, or distort the fibers.
Do not insert a tool deeply into a perforation or underneath stitching. Seat-cover guidance lists tweezers, cotton swabs, soft brushes, and wooden toothpicks as possible crevice tools, but it also warns that suitability depends on the upholstery and that aggressive work can damage fabric.
Keep liquid use around seams and perforations to a minimum. Right Car Detailing warns that oversaturation can allow moisture to reach the seat padding and that aggressive work around stitching may cause damage. Its guide recommends light application, blotting, and material-specific products.
The supplied evidence does not validate a universal solvent, steam, or saturation process for perforated, heated, ventilated, or sensor-equipped seats. Consult the vehicle manual before applying liquid or heat around those features and seek professional help early when the gum extends beneath the visible upholstery.
Stop if:
- Stitching begins to lift, stretch, or tear
- Fabric starts to fray, pill, or distort
- Gum disappears into a hole or beneath a seam
- The area becomes unusually wet
- Dye transfers to the towel
- The finish becomes dull, sticky, softened, or discolored
- Reaching the deposit would require inserting a tool deeply into the seat
The goal is not to retrieve every microscopic speck at any cost. Once the next action threatens the upholstery, the risk has overtaken the cosmetic benefit.
Household remedies and stronger products: what carries more risk
Household remedies and stronger removers are conditional fallback options, not equivalents to bagged ice, a plastic edge, and a compatible upholstery cleaner. Their suitability depends on the exact material, finish, dye, concentration, and application method.
White vinegar
Recommendations for vinegar conflict. Some commercial guides suggest it for residue on cloth or vinyl, while other guidance warns against applying it to leather because it may dry or alter the finish.
For cloth, consider vinegar only when the vehicle or upholstery-care instructions affirmatively approve it for that specific fabric. The absence of an explicit prohibition is not sufficient. If there is no clear approval, use a compatible automotive upholstery cleaner instead.
Where vinegar is expressly permitted, test the intended mixture in a concealed area, allow the test to dry fully, and inspect it. Apply only a small amount to a towel rather than soaking the seat. Stop if color transfers or the material’s appearance or feel changes.
Do not extrapolate a successful cloth test to vinyl, synthetic leather, or coated leather. Similar appearance does not establish chemical compatibility.
Rubbing alcohol
Rubbing alcohol is also disputed. Some detailing articles propose a small amount for stubborn residue, while others warn that it may dull, discolor, or dry leather and coated surfaces.
If the care instructions expressly allow alcohol on a particular cloth upholstery, perform a fully dried hidden-area test first. Apply a minimal amount to a clean towel and dab only the remaining film. Do not pour it onto the seat. Stop immediately if the towel picks up dye or the material changes.
For leather, vinyl, and synthetic surfaces, use alcohol only when both the vehicle guidance and product directions permit it for that exact finish. Florida Sudz describes alcohol as a stronger residue option but warns that it can dry leather and recommends checking material compatibility before use. Its guide also cautions against forceful scrubbing and oily remedies.
Commercial adhesive remover
The word “automotive” on a front label does not necessarily mean a product is suitable for every interior surface. Use an adhesive remover only if its label expressly permits the exact upholstery material.
Follow all label directions for ventilation, application, contact time, removal, and cleanup. Patch-test first and use the minimum amount required. If the label mentions only glass, metal, paint, carpet, or exterior trim, that does not establish permission to use it on coated leather, synthetic leather, or vinyl upholstery.
Peanut butter, mayonnaise, and oily remedies
Oily substances may alter the way gum releases, but they can replace one problem with another. On cloth, peanut butter, mayonnaise, or cooking oil may leave a spreading grease stain.
These are poor routine choices. Panda Hub’s guide warns that peanut butter can leave an oil stain on fabric, even while presenting it as one possible method. Its cautions illustrate why an approved upholstery cleaner is the more defensible first choice.
If an oily remedy has already been applied, lift away the excess without rubbing. Use only a degreasing treatment approved for the identified material, or stop and seek professional advice.
Heat and steam
Do not use a hair dryer, hot water, or another heat source as the standard approach. Heat can soften the gum, increase smearing, and make it harder to remove cleanly. Commercial sources disagree about controlled heat, but cold removal is the more consistently supported first step in the supplied evidence.
Steam is not universally validated for automotive upholstery. It adds heat and moisture, and the evidence supplied here does not establish a general steam procedure for delicate finishes or perforated and feature-equipped seats. Leave deposits that appear to require steam or saturation to a professional who can assess the material and seat design.
Methods to avoid
- Knives, razor blades, screwdrivers, and sharp metal picks
- Scrubbing gum while it is soft
- Pulling hard on gum attached to fibers or stitching
- Pouring cleaner directly onto the seat
- Saturating seams, perforations, or cushion padding
- Using solvents not approved for the exact material
- Routine use of peanut butter, mayonnaise, or cooking oil
- Uncontrolled heat, hot water, or a hair dryer
- Assuming steam is suitable for every seat
Clean, dry, and inspect the treated area
Once the gum and visible residue are gone, remove any remaining cleaner according to its label. Do not improvise a universal water rinse. Some products call for wiping with a damp towel, some require extraction, and others specify a different finishing step.
Blot moisture with a clean towel. Use light pressure and rotate to a dry section until little or no moisture transfers. Do not keep adding water in an attempt to remove every trace in one pass.
Allow the area to air-dry fully before deciding whether the treatment worked. Keep the seat uncovered and provide ordinary ventilation. Do not sit on the area while it remains damp or tacky, and do not cover it with plastic or another nonbreathable item that would impede drying.
There is no single drying period that fits every upholstery material, product, climate, and degree of wetness. Seat-cover guidance recommends drying the treated material thoroughly, while material-specific product instructions should determine whether any additional rinsing or extraction is required. See Seat Cover Solutions’ discussion of blotting, cleanup, and drying.
Inspect the dry seat in bright, indirect light from more than one angle. Look for:
- Remaining tackiness
- A dark ring, pale patch, or oil halo
- Dye transfer or bleeding
- Dulling or excess shine
- Stiffness or rough texture
- Frayed fibers or disturbed nap
- Cracking, peeling, or softening
- Pulled stitching
- Persistent dampness or odor
If a small amount of residue remains and the surface is unchanged, repeat only the least aggressive compatible step. That may be another chill-and-lift cycle for a tangible speck or another light blot with the same approved cleaner. Do not escalate automatically to alcohol or adhesive remover because one pass was incomplete.
For a compatible leather finish, apply conditioner only when the vehicle instructions or leather-care product directions recommend it.
If liquid may have reached the padding, do not guess at a drying deadline. Persistent dampness, an emerging odor, or moisture that reappears under light pressure is a reason to seek professional assessment rather than repeatedly wetting the seat.
Troubleshooting and knowing when to stop
The gum melted or smeared during an earlier attempt
Stop rubbing and remove any heat source. Do not add cleaner while the gum remains soft.
Apply sealed ice until the smear becomes firm, then lift from its thickest outer edges in small increments. Gather fragments as they detach and refreeze whenever the gum begins stretching.
Treat any thin remaining film only after the movable gum has been removed.
The gum is old, flattened, or compressed into cloth
Compressed gum may surround fibers instead of sitting on top of them. Chill the area, lift only what releases easily, and rechill. Several short cycles are preferable to forcing a plastic card underneath at a steep angle.
Stop if lifting pulls loops, creates fuzz, or distorts the weave. Burbank Car Detail recommends ice and gradual lifting for fabric while identifying old, flattened, or deeply embedded gum as a reasonable point for professional treatment. It also warns that scrubbing soft gum can spread it through the fibers. Read its fabric-focused removal guidance.
A sticky film remains after one cleaning attempt
Let the area dry before repeating anything. Confirm the material, reread the cleaner’s application and removal directions, and inspect the patch-test location again.
Those conditions do not call for the same treatment. If the same compatible cleaner may safely be repeated, use less product and controlled blotting. If the next proposed step is an unapproved stronger solvent, do not escalate.
The seat starts changing
Stop immediately if:
- A towel picks up upholstery dye
- The seat becomes dull, unusually glossy, tacky, or softened
- Leather stiffens, cracks, peels, or changes color
- Fabric frays, pills, or loses its normal texture
- Stitching pulls or loosens
- The area becomes unusually wet
- A ring or halo expands as the spot dries
Remove remaining product only as its label directs, avoid further rubbing, and allow the area to dry. Photograph the affected spot and product label if you plan to ask a vehicle dealer, upholstery specialist, or detailer for help.
The gum is in delicate or complex upholstery
Professional help is reasonable for suede, Alcantara, perforated leather, broad smears, damaged stitching, deeply compressed gum, visible finish changes, or repeated unsuccessful attempts. It is also prudent when reaching the deposit would require saturation, steam, heat, or a chemical not approved for the material.
Professional treatment is not guaranteed to be damage-free. It may, however, provide access to material-specific products and extraction equipment not available in a basic DIY kit.
Most of the procedural evidence for gum removal comes from commercial detailing companies and upholstery retailers rather than controlled comparisons across modern seat materials. Their broad agreement supports cold, gentle lifting as a prudent starting point, but it does not prove that any process is universally safe.
The decision rule is simple: if gentle chilling and lifting are not working—or the next step requires a chemical that is not approved for the material—stop rather than increasing force or solvent strength.
Frequently asked questions
How long should I hold ice on gum stuck to a car seat?
Published commercial guidance ranges from about 5 to 20 minutes. Panda Hub gives a range of 5–10 minutes, while LeatherNeo suggests 15–20 minutes for leather. These are estimates, not guaranteed preparation times.
Hold sealed ice or a bagged cold pack against the gum until it feels hard and lifts without bending or smearing. Firmness is the more useful endpoint. If the gum softens while you work, refreeze it.
Can I use vinegar or rubbing alcohol on a leather car seat?
Not as a general recommendation. Commercial advice conflicts, and either liquid may alter some leather dyes, coatings, finishes, or surface feel.
Begin with an automotive leather cleaner specifically approved for the vehicle’s finish. Use vinegar or alcohol only if the vehicle instructions and the product label expressly permit that substance on the exact leather surface. Even then, test a tiny concealed area, let it dry fully, and inspect it before treating the visible spot.
If the finish is unknown, do not use vinegar or alcohol.
What can I use if I do not have a plastic scraper?
Use an expired credit card, gift card, hotel key card, or loyalty card with a smooth, undamaged edge. A clean, flexible plastic kitchen scraper may also work if it has no sharp corners.
Hold the edge nearly flat and lift small sections from the outside inward. Do not substitute a razor, knife, screwdriver, or sharp metal pick.
Tweezers may help with a loose frozen fragment if they can grasp the gum without contacting fibers, stitching, or the seat finish.
What should I do if the gum has melted or smeared into fabric?
Stop rubbing and remove any heat source. Chill the area with ice in a sealed bag until the smear firms. Lift small amounts from the outer edge with a nearly flat plastic card, rechilling whenever the gum stretches.
After removing as much hardened material as possible, patch-test a fabric-compatible automotive upholstery cleaner. Apply a small amount to a towel and blot rather than saturating or scrubbing.
Stop and seek professional help if the gum is pressed deeply through the weave, fibers begin to pull, or the smear covers a broad area.
When should a professional remove gum from a car seat?
Consider professional help when gum is:
- Deeply compressed or broadly smeared
- Trapped beneath stitching
- Lodged in perforations
- Embedded in suede or Alcantara
- On unidentified or specialty leather
- Associated with damaged seams or a visible finish change
- Still present after several careful attempts
Stop DIY treatment if dye transfers, the surface becomes dull or tacky, leather stiffens or cracks, fabric frays, stitching pulls, or the area becomes unusually wet. Step back as well if continued removal would require steam, uncontrolled heat, saturation, or a solvent not approved for the upholstery.
The lowest-risk process remains consistent: identify the material, chill the gum in a sealed bag until firm, lift gradually with a nearly flat plastic edge, and refreeze instead of forcing it. Clean only the remaining film with a compatible, fully patch-tested product. If the seat changes in color, texture, finish, stitching, or moisture level—or the gum is embedded in delicate or perforated upholstery—stop and obtain material-specific professional guidance.